Pin Reaper: Sookay
Original Inspiration: https://www.pinterest.com/pin/203295370653854756/
via: http://www.craftaholicsanonymous.net/21-tips-for-diy-sharpie-marker-mugs
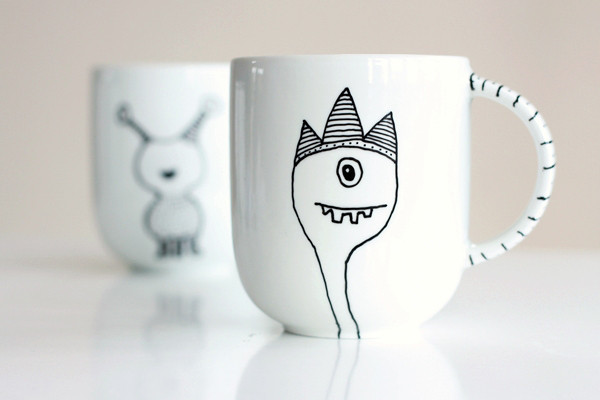
What I Did: I overheard my sister-in-law complain that she wished she had her own mug that no one else would use (she LOVES coffee). I’m broke, and so for Christmas I decided I’d make her a personalized Sharpie mug with drawings of some of her tattoos and her name. Now, I’ve had a few Pinterest fails in the past, so I looked for more than just the get a cheap mug, use a Sharpie, let dry for 1/2 hour, and bake cold (place in the oven before oven heats up) for 30 min at 350°’. I’d thought I’d found some decent sites with people who had recently failed at this, and so I followed their edited directions instead. After hours of drawing samples and then finally putting the sharpie on the mug, I was rather proud of myself (I have next to 0 drawing skills), and the images were super vibrant. I let it dry for 2 days and then baked it cold at 450° for 45 minutes and let it sit in there as the oven cooled… and was appalled at the burned off colors. I ended up making her something else, but I included this mug, with the before/after pictures and told her she could keep it or throw it against a wall, my feelings wouldn’t be hurt. I think she liked it, despite the drab colors.
My Result:
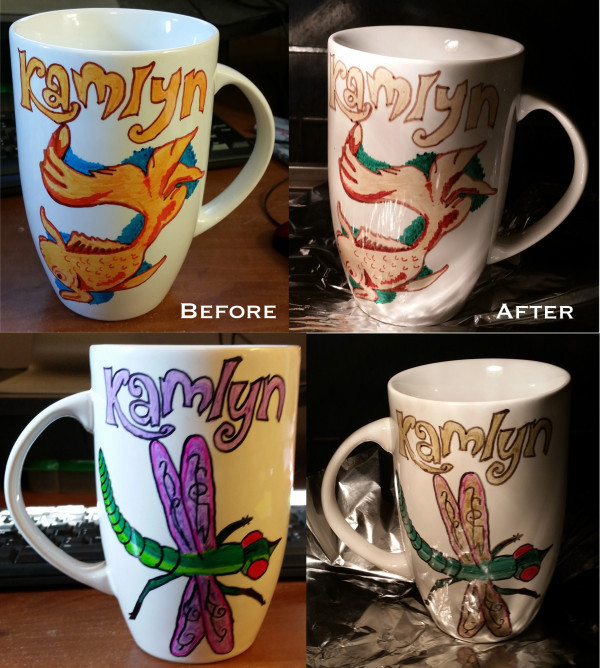
Next Time I Will: This project is tough because of the glaze on the mug, specifically in that you don’t know what quality glaze they used - cheap mug or not. Most of the sites say get the cheapest mug you can, and I found this one at Target for $2.99, so I thought I was on the right track (the cheaper the mug, usually the lower quality the glaze and the easier it is to melt/reform it over the Sharpie). I might look into more sites next time and see if the type of sharpie really does make a difference. I read mixed reviews on oil-based or regular markers, so I just used regular Sharpies. I kind of doubt the temperature difference from most blogs of 350° made that much of a difference as the choice in Sharpies did. But, I wasn’t willing to buy a bunch of mugs and markers just to try it out.
I did this for gifts from my son this past Christmas. We used these markers and didn’t have a problem:
http://smile.amazon.com/gp/product/B003VQ9M04?psc=1&redirect=true&ref_=oh_aui_detailpage_o04_s00
The colors may not be as vibrant as you wanted but you should be proud of your handiwork. The mugs are still beautiful and it’s a very personalized gift! You didn’t say how she reacted but I hope she didn’t “throw the mug against a wall”. I mean, who else has this exact mug with this exact drawing?? It’s lovely. Great job!!
You have to use a special sharpie-they have to be oil based. You can get them at a craft store. They come in a variety of colors as well 🙂
Look here for further directions. This is not my website, but I know it works.
http://somethingturquoise.com/2015/01/13/diy-sharpie-mug-engagement-gift/
Do you have a dollar store nearby? Dollar Tree has lots of nice mugs, so you can try again without breaking the bank!
Maybe you really baked it too long at a too high temperature. The colors remind of a failed fimo clay experiment in my youth, I had also lilac in it and baked it too long and it came out the same color as your lilac… so maybe…
Hey! Look at it this way, the mug’s art will perfectly match her tats in a decade! Here’s to forward thinking and great life choices!